Being able to draw basic shapes is extremely important in building a GUI. This tutorial is part of a series on drawing primitive shapes. Today we will explore arcs.
If you are not familiar with LVGL descriptors then I would suggest looking at the intro page for this series. How to Draw a Rectangle with Micropython LVGL
Arcs are the tool, that lets you draw rounded shapes. Today we will look at how you create and modify arcs and how to use an arc to create a circle.
Setting Up a Micropython Screen
Obviously if you are creating a program that draws things on a screen, you have to have access to a screen.
Because there or so many different screens out there, I can’t add support for all of them, so to make this code work, you will need to add your screen’s setup code to the beginning of the example.
There is a little more information on this process at How to get a LVGL Micropython Screen to Work if you aren’t familiar on how it’s done.
Here is the Example
import lvgl


def draw(data):
    arc = lvgl.draw_arc_dsc_t()
    arc.init()
    arc.color = lvgl.color_hex(0x0000FF)
    arc.width = 50
    arc.rounded = 1

    spot = lvgl.point_t()
    spot.x = 120
    spot.y = 160

    arc2 = lvgl.draw_arc_dsc_t()
    arc2.init()
    arc2.color = lvgl.color_hex(0x00ff00)
    arc2.width = 20

    spot2 = lvgl.point_t()
    spot2.x = 260
    spot2.y = 120

    arc3 = lvgl.draw_arc_dsc_t()
    arc3.init()
    arc3.color = lvgl.color_hex(0xFF0000)
    arc3.width = 10
    arc3.rounded = 1

    spot3 = lvgl.point_t()
    spot3.x = 140
    spot3.y = 140

    draw_ctx = data.get_draw_ctx()
    draw_ctx.arc(arc,spot,50,90,89)
    draw_ctx.arc(arc2,spot2,55,90,-90)
    draw_ctx.arc(arc3,spot3,100,250,-60)

scr = lvgl.scr_act()
scr.add_event_cb(draw,lvgl.EVENT.DRAW_MAIN_END,None)
scr.invalidate()
Understanding This Code
Just looking at a block of code is not always very informational. To make how the code works more clear, lets walk through the lines of code above and see what they do.
The Setup
To begin, we need to import the LVGL module. This would be a good spot to add your screen setup code.
import lvglThe Draw Function
When drawing shapes directly to the screen, it’s best if we put all the drawing related code inside of a draw function.
To do that we start by defining a new function.
def draw(data):To make the inside of this function more understandable we will divide it into four parts.
The First Arc
First, we need to create a new arc descriptor (it’s like a LVGL style).
arc = lvgl.draw_arc_dsc_t()We also need to initialize it.
arc.init()Then, we will set the color of our arc to blue.
arc.color = lvgl.color_hex(0x0000FF)After that, we will set the width of the arc to 50 pixels. Later on we will set the radius of the arc to 50 as well. If the radius and width of an arc are the same then your arc will be a circle.
Something to keep in mind is that we can control how much of an arc is visible, so even thought this arc starts out as a circle that doesn’t mean it will be a perfect circle when we are done with it.
arc.width = 50Next, we tell the computer that we want rounded corners.
arc.rounded = 1Our next step is to create a LVGL point object.
spot = lvgl.point_t()Then, we will set the x and y coordinates of that point.
    spot.x = 120
    spot.y = 160
The Second Arc
This arc is very similar to the last one. We start by creating and initializing a new arc descriptor.
    arc2 = lvgl.draw_arc_dsc_t()
    arc2.init()
After that, we set the color to blue and the width to 20 pixels.
    arc2.color = lvgl.color_hex(0x00ff00)
    arc2.width = 20
Then, we create a new point and set its x and y values.
    spot2 = lvgl.point_t()
    spot2.x = 260
    spot2.y = 120
The Third Arc
First, we create a new arc and initilise it.
    arc3 = lvgl.draw_arc_dsc_t()
    arc3.init()
Then, we set its color and width, and we will make it have rounded corners as well.
    arc3.color = lvgl.color_hex(0xFF0000)
    arc3.width = 10
    arc3.rounded = 1
After that, we create a new point and set its x and y values.
    spot3 = lvgl.point_t()
    spot3.x = 140
    spot3.y = 140
Making the Arcs Visible
We have created three sets of arc descriptors and their points. Now we need to use draw_ctx to actually draw them onto the screen.
To begin, lets get the draw_ctx variable.
draw_ctx = data.get_draw_ctx()Then, we will use it to draw the first arc. The three numbers mean the following things:
The 50 tells the computer to draw an arc that has a radius of 50 pixels.
The the 90 tells the computer to start drawing the arc at 90 degrees.
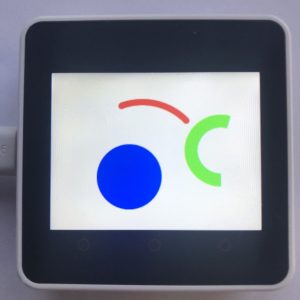
The 89 tells it to end the arc at 89 degrees. Because LVGL draws arcs clockwise it will start the arc at 90 degrees and go all the way round until it stop at 89 degrees. That is why this arc looks like a circle.
draw_ctx.arc(arc,spot,50,90,89) After that, we draw the second arc.
draw_ctx.arc(arc2,spot2,55,90,-90)Finally, we draw the last arc.
draw_ctx.arc(arc3,spot3,100,250,-60)Running the Draw Function
We just made a function that draws three arcs. The last step we have to do is connect it to the object that it will draw on.
We are going to use the screen object but first we have to retrieve it.
scr = lvgl.scr_act()Then, we add the draw function to the screen object.
scr.add_event_cb(draw,lvgl.EVENT.DRAW_MAIN_END,None)Finally, we invalidate the screen so the arcs get drawn.
scr.invalidate()What You Should See
Once you run the code above, your screen should display a blue circle, a red arc, and a green arc. If you play around with the width, radius, x, y, start_angle, and end_angle, you can create pretty much any rounded shape you want.
What makes arcs super useful is the control you have. Not only can you draw arcs on the screen with minimal memory usage but you can edit any arcs that was already going to be draw which means you can customize the widgets that already exist to suit your needs.
If you want to know how to use some more draw descriptors you might be interested in LVGL rectangles or LVGL polygons.