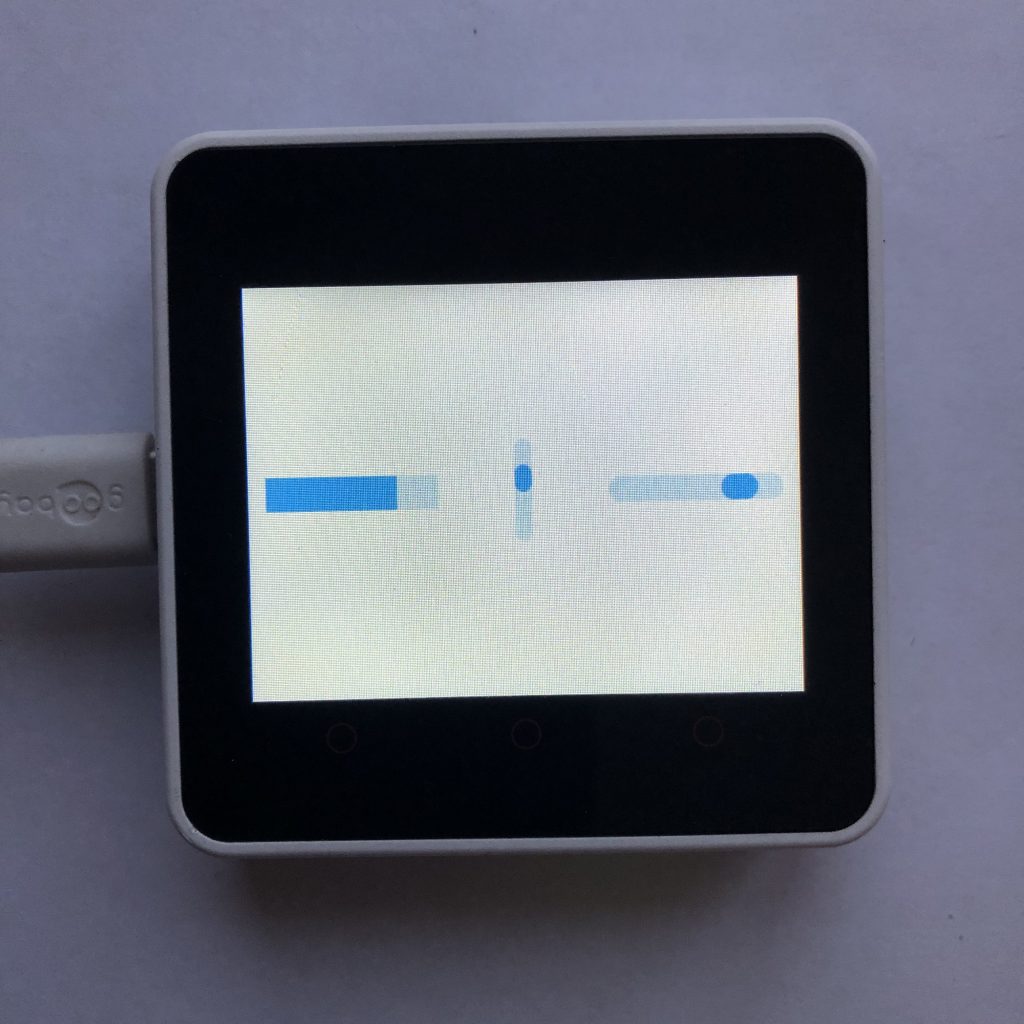
Output Bars are one of those things we see all of the time. You can find them in scroll bars, progress bars, etc. They are all over the place, because bars allow you to show numbers in a more visual way.
Today I will show you how to create and edit LVGL bars. We will work through the three main types of bars and setting each of there values.
Setting Up a Micropython Screen
Obviously, if you are creating a program that draws things on a screen, you have to have access to a screen.
Because there are so many different screens out there you could use with micropython, I can’t add support for all of them, so to make this example work, you will need to add your screen’s setup code to the beginning of the example.
There is a little more information on this process at How to get a LVGL Micropython Screen to Work if you aren’t familiar on how it’s done.
Here is the code we will work through.
import lvgl


bar1 = lvgl.bar(lvgl.scr_act())
bar1.set_size(100,20)
bar1.align(lvgl.ALIGN.CENTER,-100,0)
bar1.set_value(50,lvgl.ANIM.OFF)
bar1.set_range(0,100)
bar1.set_style_radius(0,0)
bar1.set_style_radius(0,lvgl.PART.INDICATOR)

bar2 = lvgl.bar(lvgl.scr_act())
bar2.set_size(10,60)
bar2.center()
bar2.set_value(50,lvgl.ANIM.OFF)
bar2.set_range(-50,50)
bar2.set_mode(lvgl.bar.MODE.SYMMETRICAL)

bar3 = lvgl.bar(lvgl.scr_act())
bar3.set_size(100,15)
bar3.align(lvgl.ALIGN.CENTER,100,0)
bar3.set_value(50,lvgl.ANIM.OFF)
bar3.set_range(0,100)
bar3.set_mode(lvgl.bar.MODE.RANGE)

import time
while True:
    for x in range(101):
        bar1.set_value(x,lvgl.ANIM.ON)
        bar2.set_value(x-50,lvgl.ANIM.ON)
        bar3.set_value(max(min(x+10,100),10),lvgl.ANIM.ON)
        bar3.set_start_value(max(min(x-10,99),0),lvgl.ANIM.ON)
        time.sleep(0.05)
    for x in range(100,-1,-1):
        bar1.set_value(x,lvgl.ANIM.ON)
        bar2.set_value(x-50,lvgl.ANIM.ON)
        bar3.set_value(max(min(x+10,100),10),lvgl.ANIM.ON)
        bar3.set_start_value(max(min(x-10,99),0),lvgl.ANIM.ON)
        time.sleep(0.05)
The Setup
The very first thing, we need to do is import the LVGL module. Around here is a good place to put your screen setup code.
import lvglCreating the First Bar
We will start by creating a new bar.
bar1 = lvgl.bar(lvgl.scr_act())Next, we will set the size of our bar.
bar1.set_size(100,20)After that, we will align our bar to a hundred pixels left of the center of the screen.
bar1.align(lvgl.ALIGN.CENTER,-100,0)Then we will set the default value of our bar.
bar1.set_value(50,lvgl.ANIM.OFF)We will also set the range.
bar1.set_range(0,100)Next we are going to make this bar rectangular, normally bars have rounded edges but that is not what we want here.
bar1.set_style_radius(0,0)To make the bar completely rectangular we need to remove the rounded edges from the indicator too.
bar1.set_style_radius(0,lvgl.PART.INDICATOR)Making the Vertical Bar
The next bar we want to create is the vertical one. LVGL makes this simple, first you make a bar like normal.
bar2 = lvgl.bar(lvgl.scr_act())Then, all you have to do is make the height of the bar bigger than the width.
bar2.set_size(10,60)To make the bar fit, we put it in the center of the screen.
bar2.center()After that, we will set the default value.
bar2.set_value(50,lvgl.ANIM.OFF)Next, we set the range of this bar.
bar2.set_range(-50,50)Bars have modes. We are going to put this bar into symmetrical mode which means that the bar fills from the middle out, looking at the middle bar in the picture above might help.
bar2.set_mode(lvgl.bar.MODE.SYMMETRICAL)The Range Bar
We want this last bar to be in range mode. In range mode you can set both the bar’s end value and also the bar’s start value. In the picture above you can see that this bar, the third to the right, has only a little dot colored blue.
We begin as usual by creating an new bar.
bar3 = lvgl.bar(lvgl.scr_act())Then, we do all the normal things set its size, range, value, etc.
bar3.set_size(100,15)
bar3.align(lvgl.ALIGN.CENTER,100,0)
bar3.set_value(50,lvgl.ANIM.OFF)
bar3.set_range(0,100)
And finally, we set it to range mode.
bar3.set_mode(lvgl.bar.MODE.RANGE)Creating Some Values
You probably cannot tell it from the picture, but the bars are supposed to be constantly changing their value so lets make a little code that does that for us.
First the time module needs imported.
import timeThen, we will create a infinite loop.
while True:After that, we will create a for loop that counts from 0 up to 100.
for x in range(101):X represents a number from 0 to 100 so we will simple set the value of bar1 to x.
bar1.set_value(x,lvgl.ANIM.ON)The range of bar2 is from -50 to 50 and because x can be bigger that 50, we subtract 50 from x before we use it.
bar2.set_value(x-50,lvgl.ANIM.ON)Bar3 has two values we have to set. For the first value, we add 10 to x then we do a little constraining math on x so it never dips below 10 or above 100
bar3.set_value(max(min(x+10,100),10),lvgl.ANIM.ON)Then, we set the start value to x minus 10 constrained to 0 through 99.
bar3.set_start_value(max(min(x-10,99),0),lvgl.ANIM.ON)Next, we tell the computer to wait 0.05 seconds before it resets the value of the bars.
time.sleep(0.05)Now that we have made our first for loop, we will create one more. This for loop is just like the previous, accept instead of counting up from 0-100 it counts down from 100-0.
    for x in range(100,-1,-1):
        bar1.set_value(x,lvgl.ANIM.ON)
        bar2.set_value(x-50,lvgl.ANIM.ON)
        bar3.set_value(max(min(x+10,100),10),lvgl.ANIM.ON)
        bar3.set_start_value(max(min(x-10,99),0),lvgl.ANIM.ON)
        time.sleep(0.05)
What Should Happen?
When you run the program, three bars should appear. Each should slowly increase in value and then slowly decrease and that process should repeat for ever. Don’t forget that you can stop the program by hitting the ctrl+c keys.
Bars have tons of customizability. We only went into some of things you can do like changing size and squaring, but you can also change their colors, rotate them, or shrink their indicators. That’s what makes bars so useful, you can put them in any GUI and with a little styling, they feel like they have always belonged.
If you like bars you might like arcs. They are like a bar that has been curved. If you want to now more on how to use them check out LVGL Arcs.