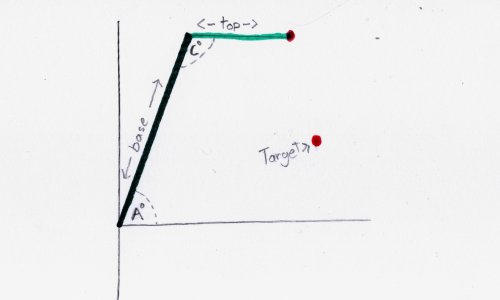
Building a robot arm is hard, but controlling one can often be even harder, especially if you want to use real distances, like telling the motor to move 5cm to the right and 10cm up.
Today we will look at the math need to control a supper simpler robot arm, in the hopes that even if you aren’t building this exact robot, you will have a good base line to start your own from.
Measuring Your Robot
To make the math work, we need to find a few numbers.
All we need is the length of each segment of the arm. For this code, we will call the length of the big arm base and the small are we will call top.
Make sure that you measure from joint to joint. Both of my robot’s arms are longer than 40 cm, but when I actually measure from joint to joint, I get 30 cm and 26.5 cm.
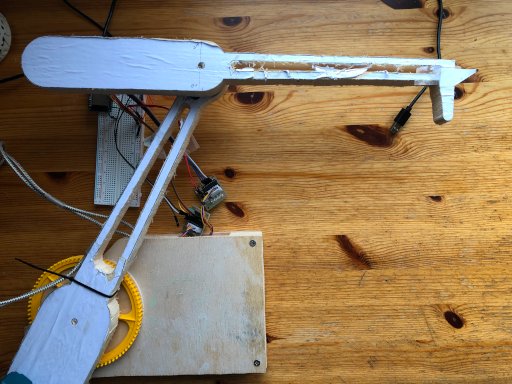
What ever unit you measure your robot with, will also be what you will control it with. Which means that because I measured my robot in cm, when I tell my robot arm to move 40 to the left it moves 40 cm to the left.
Because of this, you also need to make sure you use the same unit for every measurement.

Moving the Arm Correctly
We control the entire robot with two motors, one is connected to angle A and the other is connected to Angle C. The code, we are going to create today, will spit out the two angles those motors will need to be at to move the arm to the red dot.
And of course if the computer spits out a number like 90 degrees you need to be able to position your motor to exactly 90 degrees. Servo motors almost always do this for you automatically, but if you are using stepper motors like me, then you will probably need to do a little math.
If you are using stepper motors, you can learn more about that process at Using an Arduino to Accurately Position a Stepper Motor In Degrees
Polor Coordinates
The target position of our robot is measures in x,y coordinates. I left the x and y for the dot in the picture unmarked, because the math works for any point in reach of the robot.
The first step in our journey will be to turn x,y coordinates to polor coordinates. Polor coordinates have to values distance and angle.
Distance
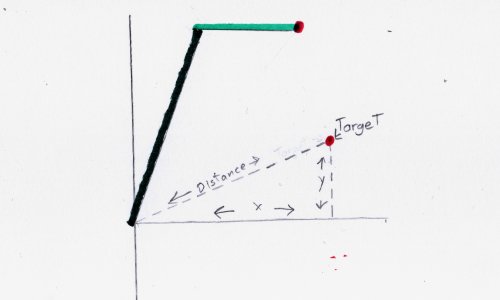

To calculate the distance of our point from the center, we use the following line of code. You may recognize the equation below from algebra. It is the Pythagorean theorem.
float distance = sqrt(x*x+y*y);Angle
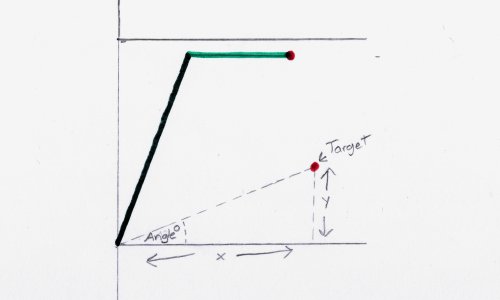

The basic equation to calculate the angle is as follows.
float angle = atan(y / x);Unfortunately this equation has one big problem. If you put in a negative number for x, it gives a completely wrong. There are two things. we need to do to fix this.
First we will make sure that the equation never gets a negative number. We will pass x through the abs() function. It forces all numbers passing through it to be positive.
float angle = atan(y / abs(x));While the code above will not fail as big, it still doesn’t allow are robot arm to move to negative x positions, so we will add the following code after it to fix that.
if(x < 0){
  angle *= -1;
  angle += 180;
}
This code simply checks if x is negative. If x is negative, it will multiply the original angle by -1 and add 180 to it. This final angle value is exactly what we want.
Radians Vs. Degrees
The are two main ways people measure angles: Radians and Degrees. I am most familiar with degrees, so it is what I am using for this code, but Arduino by default uses radians for its math functions, and one of those functions happens to be the atan() function, we used earlier.
All of that means that the original angle we calculated is measured in radians but we need it to be in degrees. Thankfully, turning radians to degrees is as simple as multiplying our number by 57.2957 like shown below.
float angle = atan(y / abs(x)) * 57.2957;As a recap, all of the code we have made up to this point should look like this.
float distance = sqrt(x*x+y*y);

float angle = atan(y / abs(x)) * 57.2957;
if(x < 0){
  angle *= -1;
  angle += 180;
}
The Real Math
We are almost to the end, but we have one last major task. The next two equations use a lot of trigonometry. This post is not intend to teach you trig, but if you want to research more about what we are doing, you can look up The Law of Cosines.


We are going to need this image again for reference.
The first equation we will use will calculate the angle C.
float C = acos(((distance * distance) - ((top_arm * top_arm) + (base_arm * base_arm))) / (-2 * top_arm * base_arm));We need to give the equation three things.
First we need to give it the distance we calculated earlier.
After that we need to give it the the length of the base arm and the top arm. For simplicity I used the following code do define those values.
#define base_arm 30
#define top_arm 26.5
Like the other equation we used earlier, this one will give us an angle in radians, so we need multiply it by 57.2957.
C *= 57.2957;The equation for angle A is very similar to the one for angle C.
float A =  acos((((top_arm * top_arm) - (base_arm * base_arm)) - (distance * distance)) / (-2 * base_arm * distance));
A *= 57.2957;
The last thing we need to do to angle A is add the angle we calculated earlier.
A += angle;Summing Up
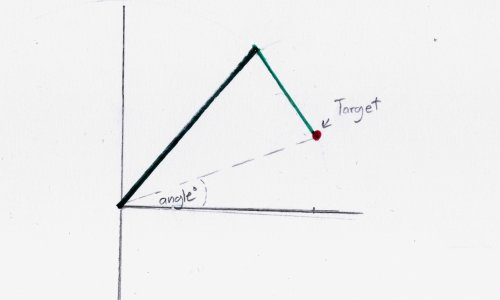

Here is all the code put together.
float distance = sqrt(x*x+y*y);

float angle = atan(y / abs(x)) * 57.2957;
if(x < 0){
  angle *= -1;
  angle += 180;
}

#define base_arm 30
#define top_arm 26.5

float C = acos(((distance * distance) - ((top_arm * top_arm) + (base_arm * base_arm))) / (-2 * top_arm * base_arm));
C *= 57.2957;

float A =  acos((((top_arm * top_arm) - (base_arm * base_arm)) - (distance * distance)) / (-2 * base_arm * distance));
A *= 57.2957;
A += angle;
To make the code work for you robot: replace x and y with the position you want your robot to move to, replace base_arm and top_arm with the correct measurements, and then make your base motor move to angle A and make your top motor move to angle C.
Inverse
It’s important to note that there is actually more than one way your motors can move your arm to reach the target. Here is the other option.
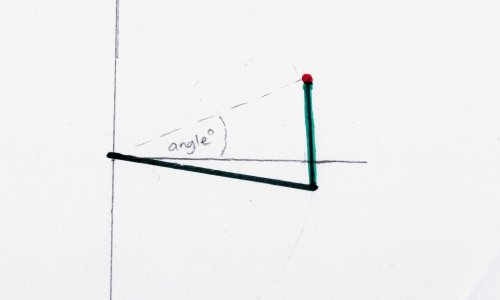

With a robot arm that has only two segments there are only two options, but if you build a robot with three segments or more there are in theory an infinite number of possible ways to reach the target.
All this means is that your program will need to handle all of those options. To day we made the program just use the first option it found and ignore the rest, but if you code in some extra logic, you can potentially find faster ways to move your robot.