Being able to send text to your board from a web page is extremely useful. With it, you could create a chat server, simple command line, or any number of other cool projects, so today I will show you a simple way to create a web page with text input.
The Path to Victory
Before we go any further its important to quickly explain, how we are going to reach our goal.
We will start by create a simple HTML web page, and I do mean simple, it is only ten lines long.
Even so I do hope you understand the basics of HTML like what a tag is. If you are a little rusty on how HTML works, there is a ton of great web pages out there that explain HTML. I find a lot of my information from W3S html.
Then we are going to create an ESP32 program to host that page and read any message the page sends out.
The HTML page
Here is the code that we are going to talk about.
<!DOCTYPE HTML>
<html>
 <body>
  <form>
   <label for = "input">Message</label>
   <input type = "text" id = "input"  name = "message">
   <input type = "submit" value = "Send">
  </form>
 </body>
</html>
Now lets look at how it works.
<!DOCTYPE HTML>We start all HTML files with the above tag. It is always put at the beginning of your HTML file, and its job is to make sure the browser uses the correct version of HTML to run your code.
Next we have the <html> tags.
<!DOCTYPE HTML>
<html>

</html>
All of the rest of our HTML code needs to go between the start <html> tag and the end </html> tag. Don’t forget the / on the end tag.
The next tag we use is the <body> tag.
<!DOCTYPE HTML>
<html>
 <body>

 </body>
</html>
Anything that is seen on your web page like images, text, buttons, etc. needs to go between the start <body> tag and the end </body> tag.
Now we have reached something that is a little more interesting, the <form> tag.
<!DOCTYPE HTML>
<html>
 <body>
  <form>

  </form>
 </body>
</html>
Forms are designed, so that you give them a bunch of inputs, like text areas and checkboxes, and if you press a special button on the screen the form sends the current value of all its inputs to the server, in are case that would be an ESP32.
We will start by putting a text box in our form.
<!DOCTYPE HTML>
<html>
 <body>
  <form>

   <input type = "text" id = "input"  name = "message">

  </form>
 </body>
</html>
As you can see to create our text box, we use the <input> tag. One thing that is a little unique about the <input> tag is that it does not have an end </input> tag.
We have to pass three attributes to the <input> tag: type, id, name.
We are setting the type of our input to text, which makes it a single line text box, but there are several other options you can choose from.
The id attribute is used for a lot of things, but today we will use it to create a label, which we are going to talk about in just a second. For now, we will set id equal to “input“, but you can call it what ever you want.
Imagine for a moment that you have a form that has several text boxes, when you send the form to the server how will it now which message comes from which text box.
Well you give each text box a name, and when the server reads a message, it is also given the name of the text box that sent the message. In HTML, you give inputs names in this way name=”SomeName”.
HTML actually takes this a step further and says, if an input doesn’t have a name, it should not be sent to the server, so make sure you give all of your inputs names.
Labels
If we ran the code right now, all we would see on the screen is a little text box, but that is not very user friendly. You almost always want a label next to your inputs, that explains what they are for, so lets create one.
<!DOCTYPE HTML>
<html>
 <body>
  <form>

   <label for = "input">Message</label>
   <input type = "text" id = "input"  name = "message">

  </form>
 </body>
</html>
Thankfully labels are pretty simple. You put the label’s text in between the start and end <label> tag.
And what makes labels cool is that you can connect them to your inputs. For example if you connect a label to a button, and then you click the label the button will be clicked as well.
You connect a label to an input with the for attribute. All you have to do is set the for attribute equal to the id of the input. We set the id of our text box to “input” earlier, so we connect our label to the textbox with for = “input”.
The Submit Button
I said earlier that there is supposed to be a button that when you click it, the form gets upload to the ESP32. Well we still need to create that button.
Fortunately it is simple. You create a new input with type = “submit” and set the value of it to what ever you want the text of the button to be.
<!DOCTYPE HTML>
<html>
 <body>
  <form>
   <label for = "input">Message</label>
   <input type = "text" id = "input"  name = "message">
   <input type = "submit" value = "Send">
  </form>
 </body>
</html>
The ESP32 Code
Ok, you have seen all the HTML code, now we will look at the ESP32 code. We are mainly going to focus on the part of the code that process the messages set by the page, but we will briefly skim through the rest of the code as well.
Here is the complete code.
#include <WiFi.h>
#include <WebServer.h>
#include <ESPmDNS.h>

WebServer server(80);


String PAGE = R"rrrrr(
<!DOCTYPE HTML>
<html>
 <body>
  <form>
   <label for = "input">Message</label>
   <input type = "text" id = "input"  name = "message">
   <input type = "submit" value = "Send">
  </form>
 </body>
</html>
)rrrrr";


void page(){
  if(server.hasArg("message")){
    Serial.println(server.arg("message"));
  }
  server.send(200,"text/html",PAGE);
}


void setup() {
  Serial.begin(115200);
  WiFi.begin("Your Wifi Name", "Your Password");
  while (WiFi.status() != WL_CONNECTED) {
    delay(100);
    Serial.print('.');
  }
  Serial.println();
  MDNS.begin("myserver");

  server.on("/",page);
  server.begin();
}

void loop() {
  server.handleClient();
  delay(5);
}
Now lets go through the code.
#include <WiFi.h>
#include <WebServer.h>
#include <ESPmDNS.h>
We start by including the three libraries needed to make our webpage.
WebServer server(80);Then we create a web server on port 80.
String PAGE = R"rrrrr(
<!DOCTYPE HTML>
<html>
 <body>
  <form>
   <label for = "input">Message</label>
   <input type = "text" id = "input"  name = "message">
   <input type = "submit" value = "Send">
  </form>
 </body>
</html>
)rrrrr";
This is the HTML code we create earlier. You can write a string that covers multiple line if you start and end it with R”some_identifier( and )some_identifier” which is what the code above does.
void page(){
  if(server.hasArg("message")){
    Serial.println(server.arg("message"));
  }
  server.send(200,"text/html",PAGE);
}
This is where all the magic happens. The function above is called whenever someone tries to access the ESP32 and it does three things.
First, it checks if the server has an argument called message. In the HTML we named the textbox message, so what this line of code is really doing is checking, if the textbox has sent anything to the ESP32.
Secondly, if it has sent something, we print the message out to the Serial Monitor.
And lastly, we send the HTML code back to the browser, so that it can show our webpage.
void setup() {
  Serial.begin(115200);
  WiFi.begin("Your Wifi Name", "Your Password");
  while (WiFi.status() != WL_CONNECTED) {
    delay(100);
    Serial.print('.');
  }
  Serial.println();
  MDNS.begin("myserver");

  server.on("/",page);
  server.begin();
}
Above is the setup function, its job is to connect to WIFI and start the server along with a few other things.
make sure to change the line that says “Your Wifi Name” and “Your Password” to your WIFI network and its password.
WiFi.begin("Your Wifi Name", "Your Password");You might also be interested in this line.
MDNS.begin("myserver");It allows you to connect to your ESP32 with the name myserver.local instead of having to use the ESP32 IP address. You can change the myserver part to what ever you want.
void loop() {
  server.handleClient();
  delay(5);
}
And of course we run the above code to make sure the webpage responds to anyone that connects to it.

Using the Code
There are two ways you can run the code on this page.
On Your Computer
Whenever you actually create you own webpage, which I highly suggest you do, its best if you write and test the code on your computer. If you want to play around with running the HTML just on your computer going to The Tools Needed to Write HTML for Microcontrollers will explain how its done.
On the ESP32
But honestly you probably just want to run the code. Take the complete arduino code( the one with numbers next to the code) and like I said earlier update the WIFI name and password.
Then you will need to upload the code to your ESP32.
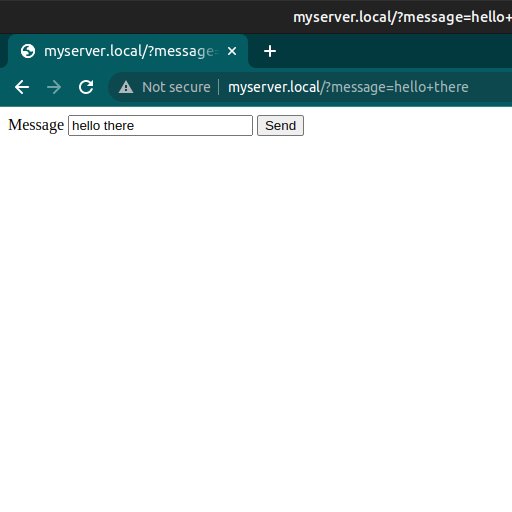
Make sure you computer is on the same network that you told the ESP32 to connect to, and then type in your browser “myserver.local“. If you get an error message, it probably just means that your board has not had a enough time to connect to the internet. All you have is wait a second or two and restart the page.
Once the page loads type what ever you want into the text box, and then hit enter or click the send button.

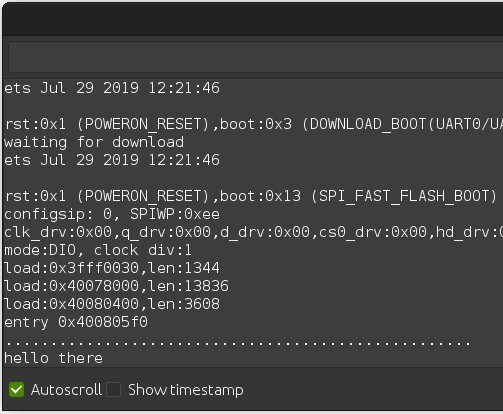
If you look at the Serial Monitor for your ESP32 you should see what you typed in the box printed to the screen.