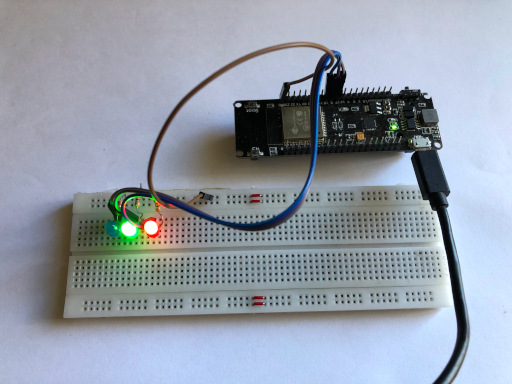
FreeRTOS is a really useful library, but learning how to use it is a bit hard, so I have created this simple example that uses FreeRTOS to blink three LEDs at different frequencies. The main focus of this example is how to use task functions and pass arguments to them.
The Parts
This project is mostly about the code, but here are the parts I used.
- 3 LEDs
- 3 resistors (220 ohm)
- 4 wires
- a breadboard
- an ESP32
Wiring up LEDs is pretty much the first thing you’re taught when learning electronics, so I will not waist your time with something you already now. I will say that I connected my LEDs to pins 17,18, and 5 of my ESP32, if you are trying to follow along exactly.
The Example Code
Here it is
struct blinkStruct {
  int pin;
  unsigned int time;
};


void blinkLED(void* arg) {
  blinkStruct data = *(blinkStruct*)arg;
  pinMode(data.pin, OUTPUT);
  while (true) {
   digitalWrite(data.pin, HIGH);
   delay(data.time);
   digitalWrite(data.pin, LOW);
   delay(data.time);
  }
  vTaskDelete(NULL);
}


void setup() {
  static blinkStruct LEDone;
  LEDone.pin = 17;
  LEDone.time = 1000;

  static blinkStruct LEDtwo;
  LEDtwo.pin = 18;
  LEDtwo.time = 300;

  static blinkStruct LEDthree;
  LEDthree.pin = 5;
  LEDthree.time = 1500;


  // blink led one
  xTaskCreate(blinkLED,"LED ONE",2048,(void*) &LEDone,1,NULL);

  // blink led two
  xTaskCreate(blinkLED,"LED TWO",2048, (void*) &LEDtwo,1, NULL);

  // blink led three
  xTaskCreate(blinkLED,"LED THREE",2048, (void*) &LEDthree,1, NULL);

}

void loop() {
}
How It Works
Now that you have seen all the code, let’s step through each section, so you can understand exactly what each part does.
The Struct
In C++, structs are a way to create a custom variable. For this example, we will need to create one that can store data for each blinking LED.
struct blinkStruct {
  int pin;
  unsigned int time;
};
This struct has two internal variables pin and time. They are pretty self explanatory, pin is the gpio pin your LED is connected to, and time is how quickly the LED should blink.
The FreeRTOS Task
Next, we are going to need to create a task function. This function will be in charge of blinking one LED.
void blinkLED(void* arg) {
  // some more code coming

  vTaskDelete(null);
}
The last thing any task function should do is call vTaskDelete(null);. Doing this deletes the task, so your computer can keep running.
Later when we call this function, we are going to pass some data to it, but that data will be stored in a void pointer(void* ), so we need to use type casting to turn it into useful data.
void blinkLED(void* arg) {
  blinkStruct data = *(blinkStruct*)arg;

  vTaskDelete(null);
}
Inside our function, we now have a variable called data, and it has two internal properties: pin and time. The next thing we will need to do is set the mode of that pin to OUTPUT.
void blinkLED(void* arg) {
  blinkStruct data = *(blinkStruct*)arg;
  pinMode(data.pin, OUTPUT);

  vTaskDelete(NULL);
}
Then, we will simply create an infinite loop, that will turn the LED on, then wait a bit, then turn it off and wait, etc.
void blinkLED(void* arg) {
  blinkStruct data = *(blinkStruct*)arg;
  pinMode(data.pin, OUTPUT);
  while (true) {
   digitalWrite(data.pin, HIGH);
   delay(data.time);
   digitalWrite(data.pin, LOW);
   delay(data.time);
  }
  vTaskDelete(NULL);
}
The Setup
This last little bit of code is going to go in the setup funciton.
void setup() {

}
We will start by creating a blinkStruct variable. Because we will use it with a task, this variable should never be deleted, so you need to make it a global or static or dynamic etc. variable. Just do something that forces the computer to not delete it.
void setup() {
  static blinkStruct LEDone;

}
Then, we will tell the computer what pin the first LED is connected to, in my case it’s pin 17, and we will tell it to blink that LED once every 1000 milliseconds(1 second) .
void setup() {
  static blinkStruct LEDone;
  LEDone.pin = 17;
  LEDone.time = 1000;
}
Now, we will just repeat that process for the remaining two LEDs.
void setup() {
  static blinkStruct LEDone;
  LEDone.pin = 17;
  LEDone.time = 1000;

  static blinkStruct LEDtwo;
  LEDtwo.pin = 18;
  LEDtwo.time = 300;

  static blinkStruct LEDthree;
  LEDthree.pin = 5;
  LEDthree.time = 1500;
}
We have several variables and a function to blink a LED, now we just need to combine them together using the xTaskCreate() function.
void setup() {
  static blinkStruct LEDone;
  LEDone.pin = 17;
  LEDone.time = 1000;

  static blinkStruct LEDtwo;
  LEDtwo.pin = 18;
  LEDtwo.time = 300;

  static blinkStruct LEDthree;
  LEDthree.pin = 5;
  LEDthree.time = 1500;


  // blink led one
  xTaskCreate(blinkLED,"LED ONE",2048,(void*) &LEDone,1,NULL);
}
And we will do the same thing for the last two LEDs.
void setup() {
  static blinkStruct LEDone;
  LEDone.pin = 17;
  LEDone.time = 1000;

  static blinkStruct LEDtwo;
  LEDtwo.pin = 18;
  LEDtwo.time = 300;

  static blinkStruct LEDthree;
  LEDthree.pin = 5;
  LEDthree.time = 1500;


  // blink led one
  xTaskCreate(blinkLED,"LED ONE",2048,(void*) &LEDone,1,NULL);

  // blink led two
  xTaskCreate(blinkLED,"LED TWO",2048, (void*) &LEDtwo,1, NULL);

  // blink led three
  xTaskCreate(blinkLED,"LED THREE",2048, (void*) &LEDthree,1, NULL);

}
What Next?
Experimenting with code is a great way to learn, so once you get this code running, you could add some extra LEDs to the code or change the timing of the ones that are already there or if you really wanted to change it, you could rewrite the blinkLED() function to flash the LEDs in a different pattern.
If you are interested in learning more about FreeRTOS, you might like to see a FreeRTOS Semaphore Example.